Raspberry Piで水温、気温、湿度を記録してZabbixでグラフ化 (DS18B20, AHT10)
概要
水槽の水温計はデジタルだと意外と高いので自作しました。ついでに室温と湿度も計って、Zabbixでグラフにします。
水温センサー: DS18B20
室温湿度センサー: AHT10
環境
Raspberry Pi Zero
Raspberry Pi OS 5.10.17+
zabbix_server 5.0.16
zabbix_agentd 5.0.14
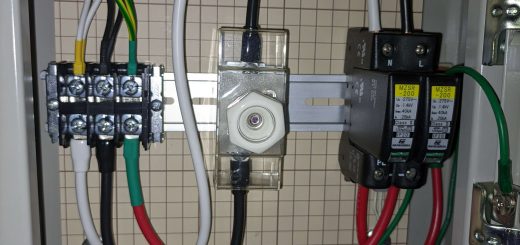
配線
AHT10の配線
まずI2Cを有効にします。
sudo raspi-config
で設定画面が開くので、Interface Options→I2Cをenableにします。
配線はVINにラズパイの3.3Vを、そしてGND、SCL、SDAをそれぞれに繋げます。
i2cdetect -y 1
を実行し、アドレス38が出てきたらOKです。
DS18B20の配線
1-Wireを有効にします。
先ほどと同じようにraspi-configからInterface Options→1-Wireをenableにします。
配線はVDDをラズパイの3.3V、DQ、GNDをそれぞれ繋ぐのですが、VDDとDQの間に4.7kΩの抵抗を挟む必要があります。
/sys/bus/w1/devices/
このディレクトリのなかに28で始まるディレクトリがあれば認識できてます。
Pythonでデータの読み取り
とりあえず、Pythonを利用してデータを読み取ってみます。
AHT10はこちらを参考に、温度の数値のみが出力されるよう少し変更を加えました。
https://github.com/gejanssen/aht10-python
AHT10の温度(temp.py)
import smbus
import time

#bus = smbus.SMBus(0)  # Rev 1 Pi uses 0
bus = smbus.SMBus(1) # Rev 2 Pi uses 1

config = [0x08, 0x00]
bus.write_i2c_block_data(0x38, 0xE1, config)
time.sleep(0.5)
byt = bus.read_byte(0x38)

MeasureCmd = [0x33, 0x00]
bus.write_i2c_block_data(0x38, 0xAC, MeasureCmd)
time.sleep(0.5)
data = bus.read_i2c_block_data(0x38,0x00)

temp = ((data[3] & 0x0F) << 16) | (data[4] << 8) | data[5]
ctemp = ((temp*200) / 1048576) - 50
print(u'{0:.1f}'.format(ctemp))
AHT10の湿度(hum.py)
import smbus
import time

#bus = smbus.SMBus(0)  # Rev 1 Pi uses 0
bus = smbus.SMBus(1) # Rev 2 Pi uses 1

config = [0x08, 0x00]
bus.write_i2c_block_data(0x38, 0xE1, config)
time.sleep(0.5)
byt = bus.read_byte(0x38)
MeasureCmd = [0x33, 0x00]
bus.write_i2c_block_data(0x38, 0xAC, MeasureCmd)
time.sleep(0.5)
data = bus.read_i2c_block_data(0x38,0x00)

tmp = ((data[1] << 16) | (data[2] << 8) | data[3]) >> 4

ctmp = int(tmp * 100 / 1048576)
print(u'{0}'.format(ctmp))
DS18B20の水温(water_temp.py)
import os
import glob
from time import sleep
os.system('modprobe w1-gpio')
os.system('modprobe w1-therm')
base_dir = '/sys/bus/w1/devices/'
device_folder = glob.glob(base_dir + '28*')[0]
device_file = device_folder + '/w1_slave'
def read_temp_raw():
f = open(device_file, 'r')
lines = f.readlines()
f.close()
return lines
def read_temp():
lines = read_temp_raw()
while lines[0].strip()[-3:] != 'YES':
sleep(0.2)
lines = read_temp_raw()
equals_pos = lines[1].find('t=')
if equals_pos != -1:
temp_string = lines[1][equals_pos + 2:]
temp_c = float(temp_string) / 1000.0
return temp_c
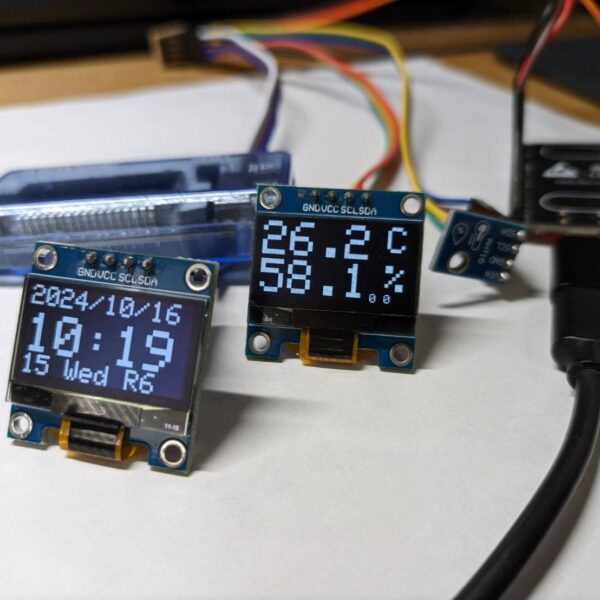
print(read_temp())実行すると、数値のみが出力されます。
これらのファイルを作成し、任意のディレクトリに入れておきます。
こちらでは、~/py/ディレクトリの中に入れておきました。
Zabbixの設定
Zabbixエージェント側の設定
まずはRaspberry Pi側にzabbix-agentをインストールします。
sudo apt install zabbix-agentzabbix-agentd.confを編集します。
sudo nano /etc/zabbix/zabbix_agentd.confServer=,ServerActive=をそれぞれサーバーのIP
Hostname=raspberrypi
そして末尾に
UserParameter=PI.ROOMTEMP,python3 /home/pi/py/temp.py
UserParameter=PI.ROOMHUM,python3 /home/pi/py/hum.py
UserParameter=PI.WATERTEMP,python3 /home/pi/py/water_temp.py
を追加します。
今回こちらでは、Zabbixサーバーは別のLinuxで立てているのでそちらを指定しましたが、Raspberry Piでサーバーを立てても構いません。Zeroでは重そうですが…
Zabbixサーバー側の設定
次に、ZabbixのWEBにアクセスし、このraspberrypiを追加します。
Configuration→Hosts→Create host
Host name raspberrypi
Groups Linux servers
Interfaces ラズパイのIP
TemplatesはTemplate OS Linux by Zabbix agentを選択しました。
ホストが認識されたらItemを作っていきます。
Configration→Hosts→raspberrypi→Items→Create item
温度
Name Room Temperature
Key PI.ROOMTEMP
Type of information Numeric (float)
Units ℃
湿度
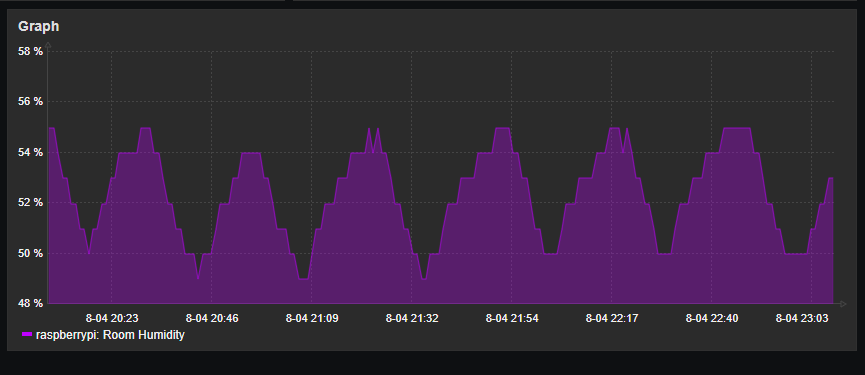
Name Room Humidity
Key PI.ROOMHUM
Type of information Numeric (float)
Units %
水温
Name Water Temperature
Key PI.WATERTEMP
Type of information Numeric (float)
Units ℃
作成してしばらくすれば値が取得できると思います。
また、グラフはHosts→raspberrypi→Graphsから作ったItemを指定すると作れます。
まとめ
ラズパイ、センサー代含めて1500円以下で作れました。
エアコンと連動させたりしてもよさそうです。


最近のコメント